Click here to view as a pdf: Ask The Vet: Get Your Spring Chicks Off To A Good Start
 By Nele Leiterman, D.V.M.
Across the country, more and more people are discovering the joys of maintaining their own backyard chicken flock. For many backyard flock owners, knowing where their meat and eggs come from, coupled with the security and self-reliance of having control of their food source is important. Even in many urban settings, city residents find that local ordinances allow for a small flock of chickens. It is not uncommon, for new people being introduced to chickens, to begin their flock by purchasing peeping chicks. When it comes to chick rearing, there are four key management areas to focus on: Temperature, Water, Feed and Lighting.
Temperature
The first thing to consider when planning to order chicks is the weather. The chicks Crystal Creek® offers hatch in Wisconsin hatcheries. They often get shipped out the same day they hatch, and usually arrive at our office the next morning. The chicks travel together with regular mail through the USPS system and there is always the possibility of the journey lasting an extra day. The hatchery, the post office staff, and the Crystal Creek® team try their best to get the chicks here safely, and temperatures above freezing help with a positive outcome. So, please don’t order your chicks too early or when a cold spell is likely.
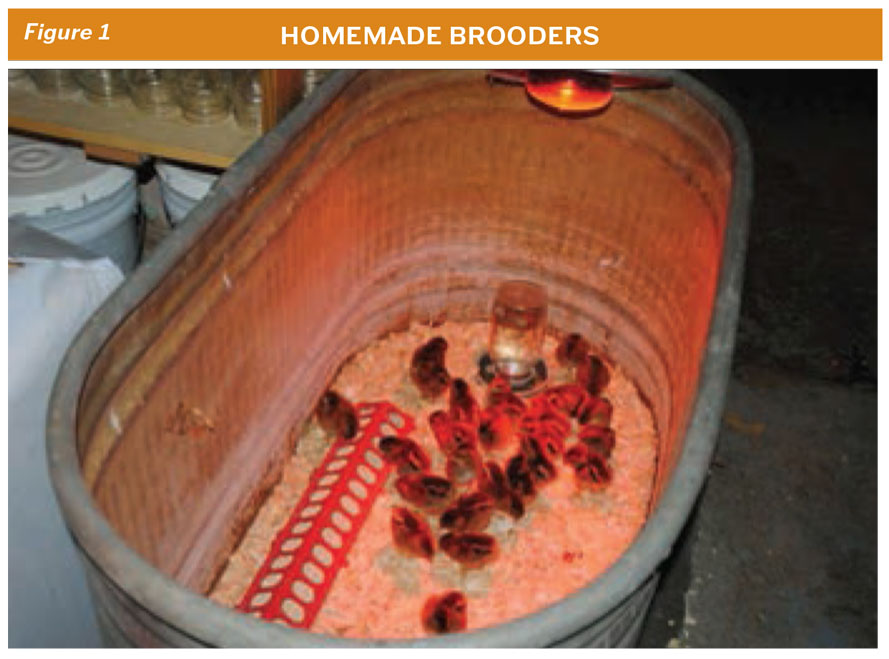
Chicks cannot regulate their own body temperature until they lose their down. They will rely on the supplemental heat within a brooder to keep warm and draft free for the first few days of their life. Brooders do not need to be expensive; in fact, they can be made from a modified stock tank, kiddie pool, or even a cardboard box within a coop. A successful brooder just needs to keep chicks warm, dry and draft free. (See Figure 1 )
Brooders should be set up and warmed to 95-97 °F prior to chick placement; continue to monitor brooder temperature for the next three days. When monitoring the brooder temperature, take the temperature 3″ from the side of the brooder and 3″ from the floor. You can use heat lamps, hoover mats, or gas heaters to warm the brooder. It’s important to ensure a stable temperature around the clock. Thermometers that lock the lowest and highest temperatures in the past 24 hours are very helpful to detect if your brooder keeps its temperature even.
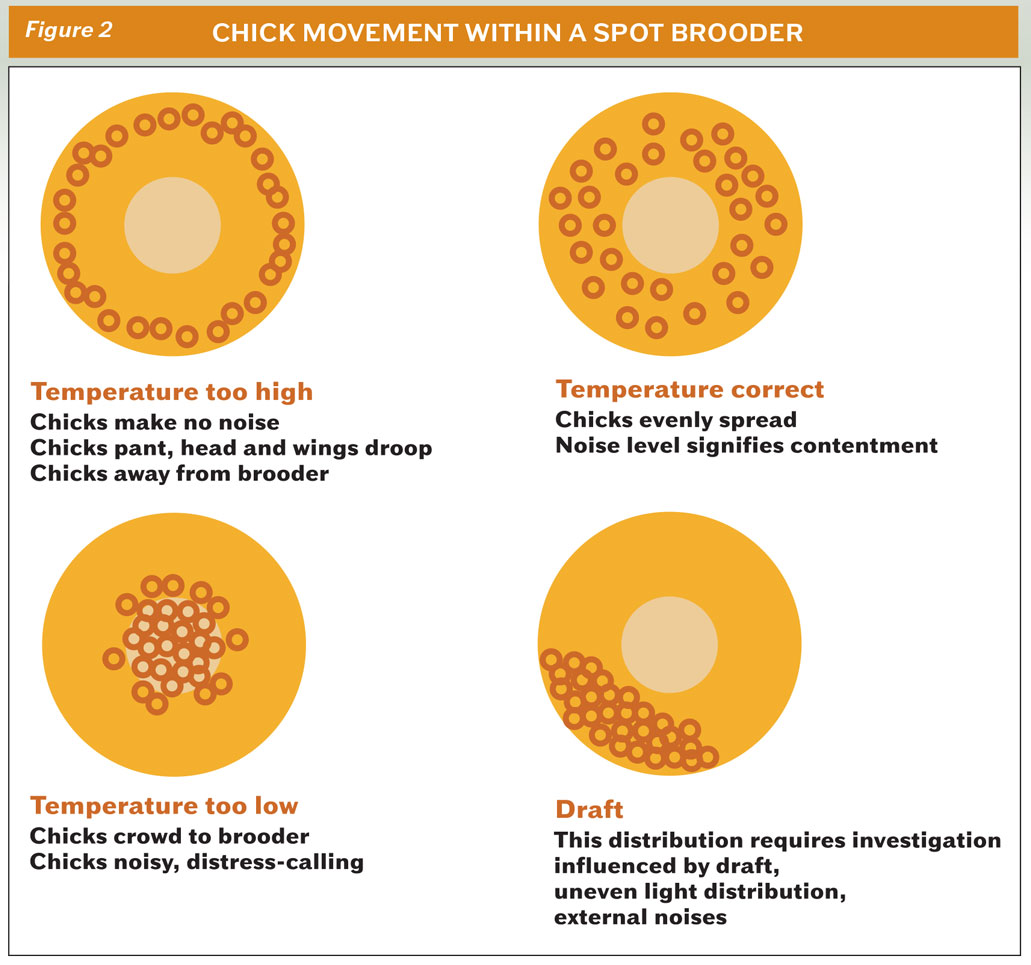
Monitoring chick movement is the best way to ensure the brooder is draft free and the correct temperature. The chicks should move around in small clusters. If the chicks are crowded to a certain edge, there is likely a draft they are trying to avoid. If the chicks surround the outer edge of the brooder with their wings outspread, they are too hot. The chicks will crowd under the heat lamps if they are too cold. (See Figure 2 )
After the first week, you should start to gradually reduce the brooder temperature to prepare the growing birds for lower temperatures. Reducing the temperature by 5 ° F every week, until you match the current outside temperature has proven to be a successful strategy.
Water
Water is the most important nutrient to a chick. Prior to hatching, a chick will ingest the remainder of the yolk. The yolk alone can provide the chick with enough water and nutrients to survive up to three days. Two to three days can pass from the time a chick hatches, gets processed and is shipped to your home. Much of the nutrients from the yolk absorption will be depleted by the time the chick arrives at your home; highlighting the importance of getting the chicks hydrated and on feed as soon as possible. The shipping process puts the chicks under stress, increasing the stress hormone cortisol. Cortisol will suppress their immune function and reduce their appetite; slowing their ability to get on feed upon arrival. Adding Crystal Creek® Whole Leaf Aloe Vera Juice to the water at a rate of 1 oz. per gallon of water will minimize the negative effects of cortisol and bolster their immune system. After the chicks arrive show them where their new waterer is by dipping every chick’s beak into the dish.
How to increase chick water consumption:
- Provide adequate access to water (2.5 linear cm/chick at the waterer)
- Provide room temperature water (72 ° F)
- Add Crystal Creek® Whole Leaf Aloe Vera Juice
- Ensure proper brooder temperature so chicks move about the space to find the water source
Feed
Early chick loss not caused by an infectious disease is commonly termed “starve out” and is the result of inadequate feed/caloric intake during the first 7-10 days of life.
How to prevent “starve out”:
- Ensure adequate water is always available. 100 chicks will consume between 5-6 quarts of water per day. (See “How to increase chick water consumption” on Page 7.) You should change the water out and clean and disinfect the waterer daily to prevent biofilms and pathogens from growing.
- Provide a quality chick starter feed that is easily digested and absorbed. The chick starter should be easily accessible with 2 cm of trough space per bird for the first month. Family Flock® Chick Starter is formulated to provide the right amount of protein, energy, trace minerals, vitamins and macro minerals to support the rapid growth rate of young chicks. Family Flock® Chick Starter is a crumble that encourages consumption via the right particle size and is easily digested without offering the chicks extra grit. Family Flock® is formulated with improved trace mineral quality which supports better immune function for healthier, more productive birds. In addition to being formulated with chelated trace minerals, the Family Flock® line of poultry feed contains 100% selenium yeast and increased levels of vitamin E. All the Family Flock® feeds provide protection to the bird’s digestive tract against common pathogens such as Salmonella and E. Coli. Quality formulation, such as this, results in more nutrient dense meat and eggs.
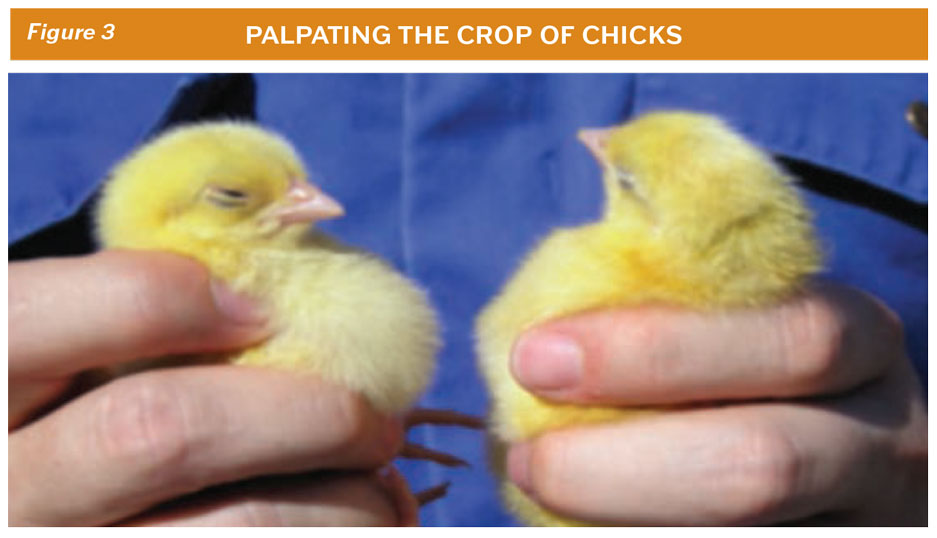
- Monitor the birds by palpating the crop of several chicks to make sure that the chicks have found the feed source. To ensure that the chicks have started eating, you can palpate the crop 24 hours after the chicks have been placed in the brooder. A chick that has eaten will have a firm, rounded crop with the texture of the feed. If the crop is round and soft the chick drank water but has not ingested any feed. A chick with an empty crop, that has not eaten or drank 24 hours after placement, is at higher risk of succumbing to starve out. (See Figure 3 )
Lighting
The most often used lighting program revolves around a period of 24-hour lighting for the first 2-3 days. The theory behind 24-hour lighting is that it provides the chicks with plenty of lighting to encourage feed intake. After 2 -3 days the lighting should be regulated by a timer that allows for 3-4 hours of darkness at night to allow the chicks to rest and fast. Short periods of fasting are important for the development of their digestive system. They need their crop to run empty for short periods of time periodically. After one week, elongate the dark time by one hour per week until you reach the current daytime schedule. During the “dark time” any red-light heat lamps may stay on. The chicks will still need the supplemental heat from the lamp, and it will help with basic orientation, while still allowing the chicks to go to sleep.
Whether you are new to raising chickens or have raised birds in the past you will find that the Crystal Creek® Family Flock® program has a feed for all stages of your bird’s production. Our knowledgeable staff is here to help you with any poultry questions you may have. For the healthiest clutch of chicks call Crystal Creek® today and talk to our knowledgeable staff for recommendations on everything from feed to supportive nutrition.
References available upon request.
Please submit your animal health or nutrition questions in writing to:
Crystal Creek®
Ask the Vet/Nutritionist
1600 Roundhouse Road
Spooner, WI 54801
OR
askthevet@crystalcreeknatural.com